Teacher Tools Day 4 – SharePoint

sharepointTeachers are constantly faced with the necessity of posting something, be it pictures, lessons, pdf files, or especially videos to the web and then allowing students access to those resources. SharePoint, from Microsoft, is the best tool for that job, bar none. While a Google drive or other cloud service may allow you to share a file and grant permissions to your students, SharePoint simplifies the process and takes sharing documents to a new level.

What is SharePoint and do I have it?

Microsoft SharePoint is a business server application that allows users to post and share almost any type of file or media and then grant access to that material to anyone they choose.  The application integrates with Microsoft Office in a way that Google drive or other cloud storage applications can not hope to match.  It allows the user to post documents, set permissions, and then edit directly with Word, Excel, or other applications simply by dragging and dropping onto a webpage or folder.  SharePoint can be mapped as a shared drive to bypass the browser or it can be accessed as a web page.  SharePoint takes care of hosting and sharing video so that putting content on YouTube, which is often blocked in schools, or filled with inappropriate images, is not necessary.  SharePoint allows for the creation of sites for groups, teams, classes, and other units, and allows the creator to set permissions for those units down to the document level.  When combined with OneNote Classroom Creator, SharePoint becomes a Learning Management System in it’s own right.  It is fully customizable and allows users to create and publish apps that others can access if they are given the necessary permissions.  In short, SharePoint is a great solution for document control for any type of data.  SharePoint also contains a social media piece that allows students to collaborate and communicate while still being fully monitored and controlled by the network administrator.  SharePoint is fully accessible from outside the school network as long as login credentials are available making it an excellent way for parents to monitor the work their students are doing.  SharePoint is fully integrated into Outlook and can be used to create calendar entries for students to post assignments and reminders.  Finally, SharePoint is easily integrated with any school web site to allow secure access for anyone with school login credentials.

The online version of SharePoint is usually included with an educational subscription to Office 365.  If your school has Office for all of its students and teachers (and it should) then you very likely have SharePoint available.  The easiest way to find out is to ask your network administrator.  If not, then he is also the person to lobby for it.

I am often asked why I prefer Microsoft Office to the free online Google applications that offer similar services.  I am preparing my students for college, and/or the business world.  They will very likely not see Google docs again after High School.  By far the majority of the  market share of business document creation software belongs to Microsoft Office.  Why not start now teaching them something they will use throughout their careers?  Most corporate workers in America will be familiar with SharePoint, Office, and the other common Microsoft business applications.  It seems a waste to teach them something that they will use only temporarily, or at least, that is my opinion.

Teacher Tools – Day 3

htmlToday my picks for useful teacher tools are both related. HTML stands for Hyper-text Markup Language. It is the code used to create web pages, among other things. The code allows us to present text and other visible features through an HTML aware browser and allows us to create links to other documents using the anchor tag.

Every teacher should be able to write basic HTML and know the common tags.  Teachers should also be familiar with creating and uploading web documents to a site.  HTML is becoming the most common way to present content to students both in the classroom and remotely.  LMS systems like Canvas or Moodle all use HTML to present content and they allow you to edit HTML tags in order to more accurately control the material that you present in your classroom pages.  Being able to control the placement of text around an image, for example, is important to the presentation of your material.  If your pages are difficult or uncomfortable to read, it is likely that students will not read them.  You owe it to yourself and your students to learn the basics of HTML and web design and to use those tools as you create your materials.

The other part of this partnership is the use of Cascading Style Sheets to format and control the appearance of your material.  It is an established design principle that content and formatting should be separate.  Having the information in a different document from the formatting instructions allows you to change the appearance of your material without having to modify, or even touch, your material.  You can also edit your content without having to wade through presentation markup.  The current web model uses a markup technology called Cascading Style Sheets (CSS) to accomplish this feat.  The content is stored in an HTML document as basically paragraphs of text with no formatting.  The paragraphs are tagged with class and id names that allow the author to assign presentation information even down to a single letter of a word or sentence.  CSS allows us to separate and update presentation and appearance for an HTML document without having to disturb the content and without having to search through the content for formatting tags.  To become a better teacher in the 21st century classroom you should commit right now to learning at least the basics of HTML and CSS and then establishing an online presence.  Build an educational philosophy page, a curriculum vitae, or a blog site to discuss the things that are important to you.

Useful Skills in Canvas

w3c_logoI am going to start a series aimed primarily at teachers who use the Canvas Learning Management System.  I have found, over the course of the last three years, some tips and tricks that can make your experience with Canvas easier, or possibly more effective.  The first trick I will offer is the use of HTML to control how your embedded images relate to the text you place them with in pages, quiz questions.  Most people ignore the HTML editor portion of Canvas and just use the Rich Content Editor.  I think this is a mistake because the HTML editor allows you much more control and functionality.  All you need is a cursory knowledge of in-line style commands and CSS.

Let’s say you wish to add a picture to the top of an informational page.  Ordinarily you would upload the file to Canvas, use the Embedded Image button in the page editor tool bar to place the picture, and then put your cursor where you want the text to appear and start typing.  The problem here is that if you wish the text to appear on one side or the other of the image and/or to wrap the image, it is difficult do do in the Rich Text Editor.  Often you end up with a single line of text next to the image and the rest of your text below the image, like this…

chrome_2017-03-08_11-05-20

With the addition of a tiny html snippet into the HTML editor you can go from this to what appears in the image below.

chrome_2017-03-08_11-10-25

To accomplish this task we only need open the HTML editor and find the code that embeds the image into the page.  We are looking for the following structure:

chrome_2017-03-08_11-12-51
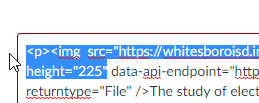
We see the line img src=”https://whitesboro…  This line tells us the source for the picture we have embedded into our page.  We need to edit that html slightly with the addition of the following snippet of html code.

“style=”float: left; padding-right: 15px;”

Everything, including the quotation marks, must be included.  Essentially this line of code tells the HTML browser to float or move the picture always to the left of the text and to give us a 15 pixel space between the right margin of the image and the start of our text.  Entered correctly, the code will now look like this…

chrome_2017-03-08_12-18-23
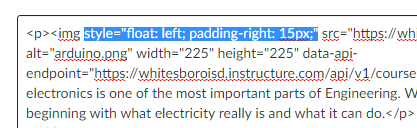
This is the same bit of html with the code snippet above pasted in.  We placed the line of code between the “img” and the “src” and now our text politely starts at the top of our image, wraps nicely around our image, and gives us a 15 pixel buffer space between the right margin of the image and the left margin of the text.  This particular bit of html can be pasted anywhere that you are allowed to edit a page with html.  In fact, I used it on the smaller images on this page at WordPress to allow me to wrap the text around the images.  This is just one example of the power that simple HTML and in-line CSS style commands provide.  The link above will take you to the W3C page on style sheets and you can begin your journey from there.

If information like this is useful to you, please leave a like and share on social media.  If there is some topic you would like covered, please leave a comment below.

#TCEA16 Reflections

tcea2016I just got in from unpacking the car after an exhausting and thrilling week at TCEA’s state-wide convention in Austin, TX and now I have a moment to pause and sort out my thoughts before I go take a nap.  (As you might suspect, this will be a short post.  I really need the nap.)

First let me say that there is a great deal of talent, passion, and enthusiasm for technology in education in Texas.  I have spent the week with several thousand people who genuinely care about educating YOUR children.  Public school teachers in Texas are not lazy by any stretch of the imagination.  They are not uncaring.  They want nothing more out of life than to see your child succeed.  They work in the face of impossible odds and with very little in the way of appreciation, either financial or social.  They don’t need a lot.  Texas teachers will teach your kids using old fashioned text books, pen and ink, or the newest SMART board and laptop.  They don’t need a lot but they make use of anything and everything.  This week I saw people using computers and robotics and I saw people using rubber bands and paper clips.  Each was just a excited and committed as the other.  Both groups are now home and reinvigorated and ready to teach on Monday, or at least they will be ready after a good night’s sleep.

To all the teachers who have spent the last week at TCEA I have some suggestions that will make the experience a bit more meaningful…

  1.  Sit down ASAP and write down your impressions and thoughts about the past week.  Don’t let all that experience go to waste.  If you met someone interesting or who offered worthwhile information, write down their contact information and enter it into your phone or email address book.  Make a committment to contact them and continue the relationship.
  2. Recopy any notes that you may have taken.  Use OneNote or some other organizational aid to put what you learned in order.  Don’t let all those brochures and handouts get wadded up into the bottom of a suitcase and tossed out with the trash.  Organize what you brought back.
  3. Commit now to work next year.  We need volunteers.  Every member should spend at least one session as a facilitator or a worker at the TCEA booth or something.  Much of the work for this convention is done by a very few people.  Be one of them.  Besides you get a really cool T-shirt that is different from everyone else’s and it is not one that can be bought or given as a door prize.  The only way to get an “I can help you get connected” T-shirt is to earn it (or you could mug someone else who earned one but that would not be very nice).
  4. REST this weekend.  Sleep late tomorrow.  This convention stuff takes it out of you.  Be ready to get busy on Monday.  Get some sleep.  Take a break tomorrow.
  5. Pick three things that really impressed you and implement or involve them in your classroom.  Don’t try to cram everything in your notes into your daily routine but do incorporate three things.  If one doesn’t work, choose another but you should be able to add three tools to your belt that will make your job easier, better, more effective, or more fun.  Write the other things down and keep them for later but make sure you add three things when you go back to work.
  6. And finally, the most important thing you can do is go back to school and share what you learned.  This is the purpose of the convention in a nutshell.  “Learn and then Teach”.  You have been given a great many opportunities, tools, and tips; share them.  Give a class on something that impressed you.  Build a document that all the teachers from your school can access.  Just don’t waste what you’ve been given.

Well that is my take on it anyhow.  I am going to start organizing my notes while I can still keep my eyes open and I will see you in the classroom on Monday.

Search Engine Tips and Tricks

Here is a lesson I presented to my classes on Internet Search Engine Techniques.  Most of the information came from About.com

Here is a short lesson I presented to my class on Search Engine Techniques.  Most of this information was gathered up on About.com and from other sources.

Three Tips for Getting More Precise Hits (Boolean Search Criteria)

  1. Use AND. Sometimes you may need to use more than one keyword when searching, without making a phrase. (Ex. Batman AND Robin)
  2. Use OR. Let’s say you perform a search using two keywords. (Ex. Superman OR Kryptonite)
  3. Use NOT. Sometimes by typing one keyword, you’ll get many results that have nothing to do with your topic. (Ex. Star Wars NOT Jar Jar)

These are the three best ways to get the results you want but very few people use them.  Everyone has experienced Search Engine Frustration.  You type in key words and then get hundreds of returns that have nothing to do with what you are trying to find.  The following is a short lesson how to optimize your searching and get the results you really want.  Here are 10 ways to find what you are looking for.

  1.  Use quotations marks when you are looking for specific quotes or phrases.
  2. Search within a specific web site using Google Site Search
  3. Use the INURL Syntax to search within URLs and addresses.
  4. Use basic math to search on the web.
  5. Use the Google Cheat Sheet.
  6. Search within specific domain prefixes
  7. Use Google to search for the weather.
  8. Use specific search engines for different purposes.
  9. Use Online Dictionaries.
  10. The final entry is using Tool bars.  These can be useful if you find yourself searching for the same types of things over and over.  The problem with search bars is that they take up space on your browser page and they are often tied to trojans or other malware.  I don’t recommend search bars but they can be useful if you understand the risks.

Using the links above, answer the following questions in the Homework section of your notebook.  Create a page and title it Ten Tips to Better Searching.  Paste the questions in and answer them in your own words.

  1.  What can you use to make sure that the search engine returns only pages with your search terms in exact order?
  2. What would you use if you wanted to search within our hs.whitesboroisd.org site for all things related to football? (hint: site:URL “keyphrase”)
  3.  How would you enter a search for all the web addresses that contained the word “bearcat”? (hint: inUrl: “keyword”)
  4. How can you search for references to Captain America and omit references to his shield?
  5. Use Google as a calculator to add 12456 + 8894837.
  6. What search term would you enter to search all the .gov sites for references to law enforcement? (hint site: .prefix “search terms”)
  7. What is the forcast for 3/22/2015 according to weather underground?
  8. List three book search engines.
  9. What is the format for getting a definition for a word on Google or Bing?  What is it on Yahoo?

Top 10 Tech Skills Every Teacher Needs – Day 2

Tech560Welcome back to day 2 of the top tech skills that every teacher needs to provide a relevant and engaging learning environment in the digital world.  Last time we listed “Search Engine Skills”, “Office Mastery”, and “Social Media”.  Tonight we present three more skills that most teachers will find indispensable.  Remember, these are in NO particular order..

4.  Teachers should be bloggers.  Blogging is a skill that every teacher should posses.  News from your classroom, important current events, and information like assignment instructions can be presented easily to a large audience via a blog site.  Blogging is also a great way to communicate with peers and keep parents informed.  At the very least, blogging is an exercise in discipline.  In order to develop a following, fresh content must be added daily (or at least more than once a week).  Reading blogs allows a teacher to keep abreast of what others are doing.  It is a great way to find useful items for use in your own class.

5.  Creating video content is a vital skill.  Teachers should be familiar with the production and distribution of digital video.  Once upon a time, video creation was reserved to professionals.  Given the abundance of video editing tools, inexpensive cameras, and the ease with which material can be posted to YouTube, Facebook, and other social media sites, there is no reason for any teacher to fall behind the video curve.  Case in point,  your humble author built a highlights video for a chemistry class that I taught in 2010 over combustion chemistry.  The effects were done in Adobe After Effects and the final edit was in Premiere Pro.


It’s not about talent, it is about providing information and generating interest in your students.

6.  Teachers should be able to build a web presence.  Using Notepad to code up and ASP or PHP site and posting it via an FTP server is not really necessary (it IS good to know how) but all teachers should have some type of an online presence.  There are many hosting solutions available today with templates already in place that allow a potential webmaster to fill in information and present a fairly professional looking site to the Internet at large.  Your schedule, contact information, a fairly recent picture, and a minimum of biographical information should be available to parents, administrators, students, and, probably most importantly, potential employers.  A web site today is more like a virtual business card/biography.  It should be indexed and easily searchable.  If you keep current and accurate information available on the web, you won’t have to worry about what others post.

Well, that is surely enough for tonight.  I will try to finish up tomorrow.  Meanwhile, have a great evening.

Technology Skills that Every Teacher Must Posses

Tech560One of the most often addressed issues for both teachers and administrators in today’s rapidly changing educational environment is exactly WHAT technologies and applications are needed to successfully deliver the content and practice the skills necessary for a post-industrial education.   What tools do we really need in order to facilitate learning for students today?  I have been researching the question extensively and these ten items seem to be making every list I can find.  No doubt this is not an exhaustive list and surely not everyone’s favorite will be present here but hey…if you don’t see your personal preference then by all means, comment and let me know what it is.  The most common things I have found, in NO particular order, are…

1.  The ability to use key words and control a search engine.  Most people use Google or Bing or some other search engine, and most know that you need to give it a clue as to what you’re looking for, but too many people, teacher or otherwise, have no idea what a search engine is capable of.  Were you aware that presenting keywords in different formats would lead to different results?  Surrounding a word or phrase, for example, with quotation marks means you are looking for that EXACT phrase, spelling, punctuation, etc.  If you enter the terms three, blind, and mice into Google you will get a great many results about eye health, rodent control, and mathematics.  If you enter the phrase “three blind mice” surrounded by quotation marks you will get only results dealing directly with the nursery rhyme in question.

The “-” or minus sign also has great significance to search engines.  If you enter keywords and would like to exclude other key words often associated with whatever you entered, then use the minus sign.  For example, if you wish to search for Batman but avoid any reference to Robin, you might enter Batman -Robin.  You will see many results for the Dark Knight but no reference to his nerdy partner.  The plus or “+” symbol works exactly opposite.  If you want to search for Captain America and specifically get info about his shield you might enter Captain America +shield.  You are likely to get results about Cap, his shield, and you will also likely get results from the Strategic Homeland Intervention, Enforcement and Logistics Division.  In order to further filter these results you could use Captain America +vibranium -“Nick Fury”.  We want info about Cap and his accessory but not about the organization of the same name.  If we purposely include a reference to that material that the shield is made from and purposely exclude the leader of the SHIELD organization, it is likely that our results will fall more into the realm of what we want to know.

There are many tutorials available online to learn search engine techniques.  You owe it to your kids to not only learn them, but share them with your classes.  Lets put an end to Search Engine Illiteracy.  A key word is a terrible thing to waste.

2.  Be a Microsoft Office Master.  Microsoft Office is the standard application suite for business in the world today.  Anyone searching for any kind of job in a corporate environment needs to be able to use Word and Excel at the very least.  If you are a teacher then you should not expect your students to do anything that you, yourself, can not do.  Setting up and switching between Chicago, MLA, and APA style formatting and citation should be second nature.  You can’t expect a student to properly format a footnote if you can’t help them get it done.  You should be able to write simple Macros for Excel in VBA and automate various Office tasks.  Passing on those types of soft skills to your students can take you from being a good teacher to being a great teacher.

3.  You should be fluent in Social Media.  Having a Facebook page that you haven’t visited since its inception does not count.  You need to able to communicate with your students using a language that they understand.  You need to be able to teach proper digital citizenship to any and every class you have.  In order to engage students you need to appear relevant.  Without social media interaction you will not be considered so.  You also need to know your limitations.  Social media is a great tool for education as long as it is used by professionals within the guidelines set by your school.  Having your students as friends on Facebook or followers on Twitter can be a tragedy in the making.  Know the rules and know your options.  Tools like Remind.com and Edmoto are invaluable but you still have to follow the rules.

…and speaking of rules.  According to the protocol for content development I have just gone past the amount of material that most people want to digest at any one reading so I am going to transform this entry into a three part series.  Be sure to drop by tomrrow and see the next three technical skills that a teacher needs.