Here We Go Again

top_ht1
Once again it is time to saddle up and prepare to ride herd on another group of technology students. With the hustle and bustle of preparing for a new year I often forget how important it is to document what works and what does not. This year my goal is to journal, at least some of my classes, with an eye towards technique. We spent the morning in a professional development seminar presented by Dave Burgess of Teach Like a Pirate fame.  Needless to say, while I did not agree wholeheartedly with everything that was said, I do believe that Mr. Burgess was correct in one very important area.  We absolutely DO need to carefully consider our presentation and we need to devise ways to make it more engaging.  We are packaging and marketing a product for sale and we are competing with some of the best marketers in the world for the attention of our students.  In order to engage our students and give them the best opportunity to retain the material we present, we must make it palatable.

Before anyone grabs the tar and feathers, I have not bought into the theory that each lesson needs to be an epic presentation of Hollywood-like special effects.  I survived the “Working on the Work” phase of 2007 and 2008.  We all built carefully crafted set-pieces to be trotted out for special occasions like evaluations.  I have seen teachers with fire station poles, amusement park rides, and all sorts of props in the classroom.  I don’t think that this is a legitimate expectation for every teacher.  I do, however, think that each of us can, and should, put more care into the format and presentation of our lessons.  Any good craftsman will be interested in improving their craft because each of us, in the end, wants to do the best we can for our kids, or at least, they should be our highest motivation.

At any rate, my goal this year is as follows:

1.) Document what I am doing in class with video, audio, and careful notes.

2.) Use that documentation to improve what I am currently doing and use legitimate data collection and analysis methods to determine what is good and what is not so effective.

3.) Brain-storm ideas for more ways to present information more accurately and more interestingly.

4.) Archive and share what works and what does not in the classroom on these pages.

Having said that…Wish me luck…Here We Go Again.

Useful Skills in Canvas

Canvas_vertical_colorDuring this edition of Technology in Education I will demonstrate the easiest method (that I know of anyhow) to integrate video into Canvas pages.  This technique will work with YouTube, Microsoft SharePoint, or any other video hosting service that allows embedding via the iframe tag.  Once again we will be using the HTML editor.First we need to select the video we wish to embed into the page we are editing.  On YouTube, videos that are available for embedding, as most are, will have a link to create the embed code for you.  You will merely need to copy this code and paste it into the html already in your page.  If we wish to include this video from OnRamps, for example, we first need to find it on YouTube…chrome_2017-03-10_17-22-58

Once we have located our video we need to find the “Share” link located directly under the title…

chrome_2017-03-10_17-26-10
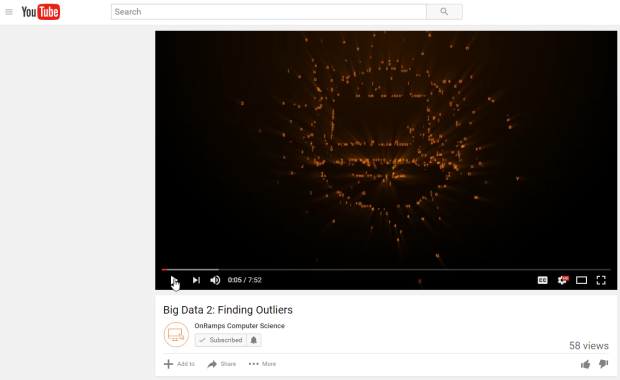
As you can see, the “Share” link is marked with a curved arrow and the word “Share”.


Clicking that link will reveal the sharing options we can make use of. The option we want to select is “Embed”.

chrome_2017-03-10_17-28-25

Selecting “Embed” will generate a snippet of html code containing our “iframe” that will allow us to embed the video into our page and have it play as though it were part of the page we are creating.  We need to copy the highlighted code and then paste it into the page we are editing using the HTML Editor.

chrome_2017-03-10_17-43-37

Once the code is pasted into our page’s html we can click the “Save” button and view the results of our work…

chrome_2017-03-10_17-42-13

Your students will be able to watch this video, assuming they have access to YouTube, without the distraction of the “Up Next” list along the right border of the page.  .

chrome_2017-03-10_17-35-17

They can access only the material that you want them to view.  Be aware that if the video is hosted on a secure server like Microsoft SharePoint, your students may have to provide a username and password to access the content.  If you look carefully at the code pasted in the example above you will notice that it says whitesboro.sharepoint.com rather than youtube.com as the source of the video.  This is because I am forced to download all videos originating from YouTube and re-host them on our SharePoint video server because students at my school do not have unlimited access to the YouTube site.  It does not matter what source you use, as long as their material is available via an “iframe”

If the material in this post has been of any help, please leave a like a comment, if nothing else, to let me know you are out there 🙂


Useful Skills in Canvas

w3c_logoI am going to start a series aimed primarily at teachers who use the Canvas Learning Management System.  I have found, over the course of the last three years, some tips and tricks that can make your experience with Canvas easier, or possibly more effective.  The first trick I will offer is the use of HTML to control how your embedded images relate to the text you place them with in pages, quiz questions.  Most people ignore the HTML editor portion of Canvas and just use the Rich Content Editor.  I think this is a mistake because the HTML editor allows you much more control and functionality.  All you need is a cursory knowledge of in-line style commands and CSS.

Let’s say you wish to add a picture to the top of an informational page.  Ordinarily you would upload the file to Canvas, use the Embedded Image button in the page editor tool bar to place the picture, and then put your cursor where you want the text to appear and start typing.  The problem here is that if you wish the text to appear on one side or the other of the image and/or to wrap the image, it is difficult do do in the Rich Text Editor.  Often you end up with a single line of text next to the image and the rest of your text below the image, like this…

chrome_2017-03-08_11-05-20

With the addition of a tiny html snippet into the HTML editor you can go from this to what appears in the image below.

chrome_2017-03-08_11-10-25

To accomplish this task we only need open the HTML editor and find the code that embeds the image into the page.  We are looking for the following structure:

chrome_2017-03-08_11-12-51
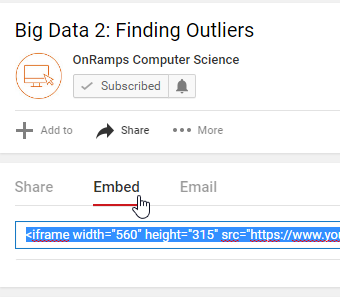
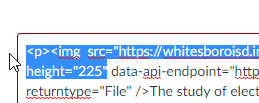
We see the line img src=”https://whitesboro…  This line tells us the source for the picture we have embedded into our page.  We need to edit that html slightly with the addition of the following snippet of html code.

“style=”float: left; padding-right: 15px;”

Everything, including the quotation marks, must be included.  Essentially this line of code tells the HTML browser to float or move the picture always to the left of the text and to give us a 15 pixel space between the right margin of the image and the start of our text.  Entered correctly, the code will now look like this…

chrome_2017-03-08_12-18-23
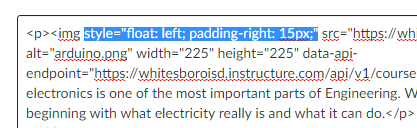
This is the same bit of html with the code snippet above pasted in.  We placed the line of code between the “img” and the “src” and now our text politely starts at the top of our image, wraps nicely around our image, and gives us a 15 pixel buffer space between the right margin of the image and the left margin of the text.  This particular bit of html can be pasted anywhere that you are allowed to edit a page with html.  In fact, I used it on the smaller images on this page at WordPress to allow me to wrap the text around the images.  This is just one example of the power that simple HTML and in-line CSS style commands provide.  The link above will take you to the W3C page on style sheets and you can begin your journey from there.

If information like this is useful to you, please leave a like and share on social media.  If there is some topic you would like covered, please leave a comment below.

Live From TCEA…Sorta

tcea17

I am currently at the premier technology education event certainly in Texas, and possibly in the world.  This is my 5th such event in as many years and so I am not exactly a newbie to this environment.  I have seen a great many changes, some good and some bad, but the one constant ingredient I find is the caring demonstrated by the educators here.  While we may not all agree on what is best for our students, we can all agree that we want the very best for our students.  I am proud to be surrounded by such professional and caring individuals

Having said that, the other draw to this incredible meeting is the amazing amount of technological innovation being displayed here.  The leading technology players in the world gather here because they know that teachers are an excellent source of sales and we seem to be drawn to toys.  Perhaps we like toys because we like kids.  Who knows?  All I know is that I am exhausted and off to bed.  Hope to see you tomorrow in Austin.

Remind Me Again

As teachers we are constantly needing to communicate with students, other teachers, parents, and other stake holders in the educational process.

remind-app

Great care must be taken to secure the student’s contact information and protect yourself from potentially career threatening liabilities.  Remind101 (now Remind.com) makes the process easy and secure.

Remind is a web site using the twitter engine to send text messages to groups of students, parents, or anyone you choose.  The text messages are sent from a third party phone number and can not be replied to in any way.  While it may seem a bit frustrating at first, you can see how this is necessary to protect both student and teacher from any possible hint of impropriety.  The message is sent from the web site by the teacher to groups of students.  Each students receives the same message.  It is impossible to sent a private message to a single student.

Remind is a free service with basically unlimited group creation and student messaging.  It is also possible to embed HTML widgets into class web pages and blog sites to show the last message sent.  Students, parents, or other recipients must register at the remind.com web site or they may send a text to a number that the web site provides in order to sign up for a specific class.  Students who have multiple teachers using the service will get all their messages from the same number.

If you are sending SMS private messages to your student’s personal phones or devices you are placing your career and reputation at great risk.  Most schools have strict rules against this practice for good reason.  To avoid the liability and still provide the information your students need, check out Remind.com.  You might find it worth your while.