![]() I am going to start a series aimed primarily at teachers who use the Canvas Learning Management System. I have found, over the course of the last three years, some tips and tricks that can make your experience with Canvas easier, or possibly more effective. The first trick I will offer is the use of HTML to control how your embedded images relate to the text you place them with in pages, quiz questions. Most people ignore the HTML editor portion of Canvas and just use the Rich Content Editor. I think this is a mistake because the HTML editor allows you much more control and functionality. All you need is a cursory knowledge of in-line style commands and CSS.
I am going to start a series aimed primarily at teachers who use the Canvas Learning Management System. I have found, over the course of the last three years, some tips and tricks that can make your experience with Canvas easier, or possibly more effective. The first trick I will offer is the use of HTML to control how your embedded images relate to the text you place them with in pages, quiz questions. Most people ignore the HTML editor portion of Canvas and just use the Rich Content Editor. I think this is a mistake because the HTML editor allows you much more control and functionality. All you need is a cursory knowledge of in-line style commands and CSS.
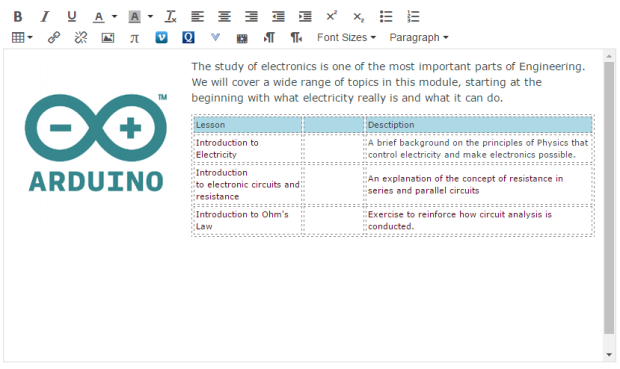
Let’s say you wish to add a picture to the top of an informational page. Ordinarily you would upload the file to Canvas, use the Embedded Image button in the page editor tool bar to place the picture, and then put your cursor where you want the text to appear and start typing. The problem here is that if you wish the text to appear on one side or the other of the image and/or to wrap the image, it is difficult do do in the Rich Text Editor. Often you end up with a single line of text next to the image and the rest of your text below the image, like this…

With the addition of a tiny html snippet into the HTML editor you can go from this to what appears in the image below.
To accomplish this task we only need open the HTML editor and find the code that embeds the image into the page. We are looking for the following structure:
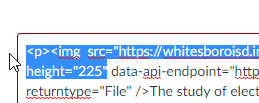 We see the line img src=”https://whitesboro… This line tells us the source for the picture we have embedded into our page. We need to edit that html slightly with the addition of the following snippet of html code.
“style=”float: left; padding-right: 15px;”
Everything, including the quotation marks, must be included. Essentially this line of code tells the HTML browser to float or move the picture always to the left of the text and to give us a 15 pixel space between the right margin of the image and the start of our text. Entered correctly, the code will now look like this…
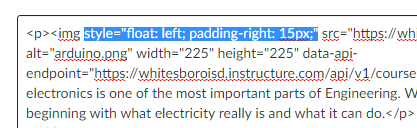 This is the same bit of html with the code snippet above pasted in. We placed the line of code between the “img” and the “src” and now our text politely starts at the top of our image, wraps nicely around our image, and gives us a 15 pixel buffer space between the right margin of the image and the left margin of the text. This particular bit of html can be pasted anywhere that you are allowed to edit a page with html. In fact, I used it on the smaller images on this page at WordPress to allow me to wrap the text around the images. This is just one example of the power that simple HTML and in-line CSS style commands provide. The link above will take you to the W3C page on style sheets and you can begin your journey from there.
If information like this is useful to you, please leave a like and share on social media. If there is some topic you would like covered, please leave a comment below.
